
Quick Answer
Fill each flashing slot on the open panel with the matching fuse type. The right slot is not enough on its own: the wrong fuse type in the right slot still fails. In We Were Here Tomorrow’s Time Crystal chapter, your partner reads the damaged panel in the other timeline while you insert fuses. The first repair uses top-left, bottom-left, then bottom-right; later repairs also require matching fuse symbols with the reference book.
Flashing positions, colored components, and the required pink component give this puzzle its different names: Time Crystal flashing fuse slots, Time Crystal colored fuses, and Time Crystal pink fuse puzzle all describe the fuse-panel repairs.
How Do You Solve the Time Crystal Fuse Panels?
Fill the open panel according to your partner’s damaged panel in the other timeline, matching both the indicated position and the fuse type. This puzzle belongs to the Time Crystal chapter. Before starting a repair, get one player to the open panel with the fuses and the other to its corresponding damaged panel. For the pink-fuse repair, collect the pink fuse before trying to finish the panel.
Your rooms match up across the two timelines, but the panels do different jobs. One player can put fuses in; the other tells them where. A fuse you insert changes the matching panel on the other side, so check in after every placement. Don't fill several slots from memory.
Why Is It Called Flashing Fuse Slots, Colored Fuses, or the Pink Fuse Puzzle?
These names describe different parts of the same Time Crystal fuse-panel puzzle.
- Time Crystal flashing fuse slots: Your partner sees a fault indication and tells you which position needs a fuse. This describes how you find the next slot.
- Time Crystal colored fuses: Later repairs require a particular fuse type as well as the right position. This describes the components you must distinguish.
- Time Crystal pink fuse puzzle: One repair needs the pink fuse before it can be completed. This describes a required component within the same series of repairs.
The flashing-slot name tells you where to act. The colored-fuse and pink-fuse names tell you why putting just any fuse there may fail. Keep those two decisions separate when giving instructions: call out the position first, then identify the component.
How Do the Fuse Symbols and Reference Book Work?
Match the symbols on the fuses with the reference book to identify the required type. Color alone is a less useful instruction when you and your partner are describing the same component differently.
| Item | Value |
|---|---|
| Two vertical lines with a circle between them | Pink fuse |
| One horizontal line and a circle | Orange fuse |
The markings are on the fuses themselves. Read the shape to your partner and compare it with the book before inserting the component. For example, describing the circle between two vertical lines gives your partner something specific to match, rather than asking them to guess which fuse you mean.
A correct slot can still contain the wrong fuse type. If a placement does not complete the repair, check the component’s symbol as well as its position.
What Is the First Flashing Fuse Slot Sequence?
The first repair sequence is top-left, bottom-left, then bottom-right. The panel has eight positions, and your partner’s fault indications guide the placements.
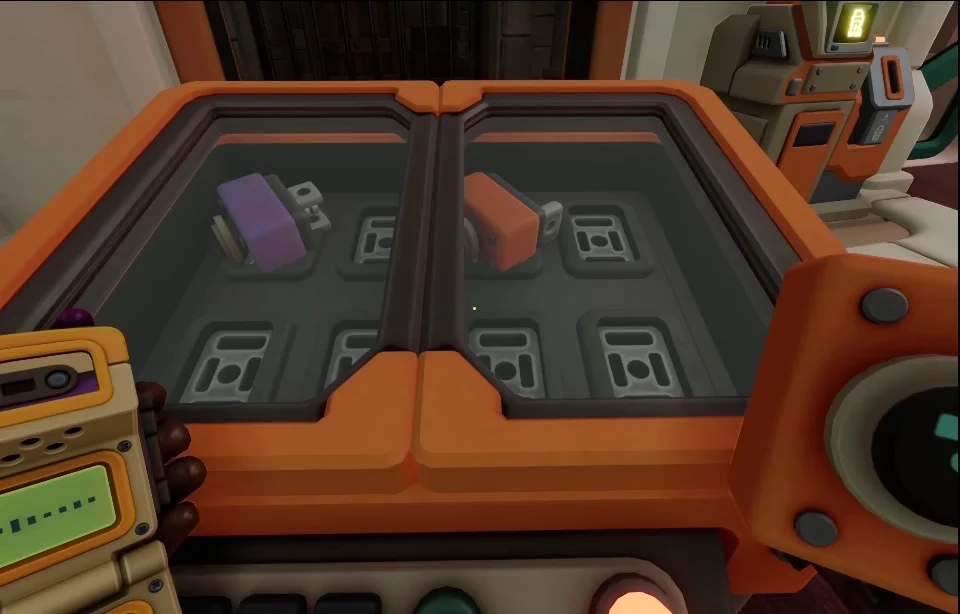
The open panel: two rows of four slots. Fill them one at a time as your partner calls them out.
- Have the player at the damaged panel identify the first flashing position.
- Insert a fuse at top-left on the open panel.
- Wait for your partner’s next indication, then fill bottom-left.
- Follow the next indication to bottom-right.
- Have your partner check the result before moving on.
Go one slot at a time and wait for the panel to react. That gives your partner time to spot the next fault, and you won't mix up the new callout with the last one.
How Do You Solve the Pink Fuse and Later Colored Fuse Repairs?
Bring the pink fuse to the open panel, then follow the damaged panel’s current indications while matching the required types. Do not assume the first repair’s three positions are enough for every later panel.
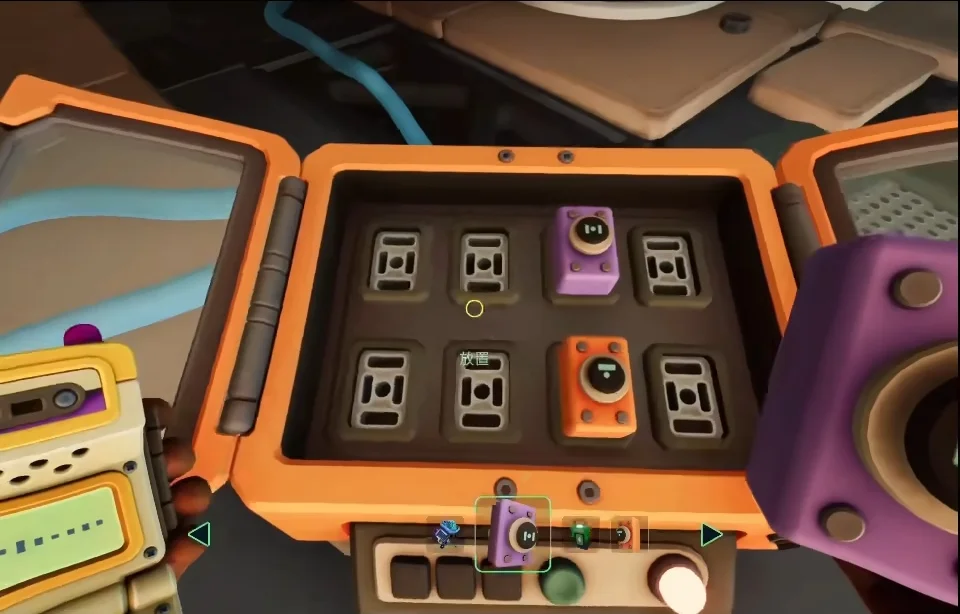
A pink fuse and an orange fuse in the panel, with the fuse tray along the bottom edge.
For the pink-fuse repair, follow these placements when your partner calls out the corresponding slots:
- Put the pink fuse in the top row’s third position when that position is indicated.
- Add another fuse at top-left when instructed.
- Add another at bottom-right when instructed.
Let your partner’s current indication decide where to act rather than treating that arrangement as a layout for every panel.
A subsequent colored-fuse repair uses the book and component symbols. Its finishing placements include pink in the top row’s second position and orange in the top row’s last position. Continue following each fault indication leading up to those placements; those two instructions are finishing steps rather than a complete panel arrangement.
No new flashing slot does not necessarily mean you are finished. Check the fuse types and whether the repair has actually opened the way forward before leaving the panel.
Who Can Insert Fuses, and What Comes Next?
Only the player whose panel is open can insert the fuses. Keep that player handling components while the other reports the damaged panel’s indications.
Swapping players does not make a closed panel usable. If you reach another repair and cannot insert anything, check which panel is open before changing roles. Having more fuses does not give the player at a closed panel access to its slots.
The later book-based arrangement is a separate step from these successive flashing-slot repairs. When you reach that mechanism, follow the Time Crystal final fuse layout.
After finishing these repairs, continue to the Time Crystal final fuse layout for the next puzzle.
FAQ
Have your partner call out faults on the damaged panel while you fill the corresponding positions on the open panel. The first repair goes top-left, bottom-left, then bottom-right.
Compare each fuse’s marking with the reference book. Two vertical lines with a circle between them identify pink; one horizontal line with a circle identifies orange.
Collect the pink fuse and match it to the position your partner indicates. When the top row’s third position is called out in that repair, place pink there, then follow the instructions for top-left and bottom-right.
An absence of flashing does not by itself signal a completed repair. Recheck the inserted fuse types and the panel’s result before moving on.